The Art of Automotive Photography: Capturing Cars’ Essence

The art of automotive photography goes beyond simply taking pictures of cars; it’s about capturing the spirit, design, and emotion that each vehicle embodies, transforming metal and mechanics into compelling visual stories.
The allure of cars extends beyond their mechanical prowess; it’s a blend of design, history, and personal connection. The art of automotive photography aims to capture this essence, transforming a vehicle into a subject of art. Let’s explore how to master this captivating field.
Understanding the Basics of Automotive Photography
Automotive photography is more than just pointing and shooting. It’s about understanding the core elements that make a photo stand out. We’ll start by exploring these essential concepts to lay a solid foundation.
To master automotive photography, it’s crucial to grasp core concepts that transform snapshots into stunning art, focusing on light, composition, and perspective to capture a car’s true essence.
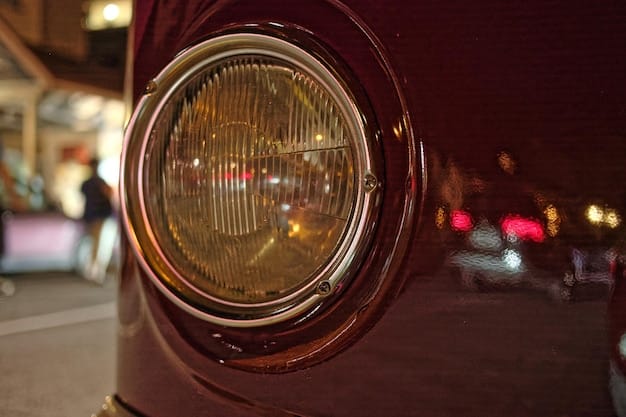
Light and Shadow
Light dramatically influences how a car is perceived. Soft, diffused light reveals subtle details, while harsh light creates strong contrasts. Pay attention to the golden hours—sunrise and sunset—when the light is warm and flattering.
Composition Techniques
Effective composition guides the viewer’s eye and highlights the car’s best features. Rules like the rule of thirds, leading lines, and symmetry can enhance visual appeal. Experiment with different angles to find unique perspectives.
- Use the **rule of thirds** to create balanced and engaging compositions.
- Employ **leading lines** to draw the viewer’s eye towards the car.
- Look for **symmetrical compositions** to convey a sense of order and balance.
- Experiment with **different angles** to highlight unique features.
Understanding these basic elements will elevate your photography, creating images that truly capture the essence of the car.
Essential Equipment for Car Photography
Having the right gear is essential for automotive photography. While a basic setup can get you started, investing in quality equipment will significantly improve your results. Let’s look at the core tools you’ll need.
Choosing the right camera, lenses, and accessories can vastly improve your ability to capture stunning automotive photos, providing flexibility and control over your shots.
Cameras and Lenses
A DSLR or mirrorless camera with manual controls is ideal. For lenses, a wide-angle lens (16-35mm) is great for dramatic shots, while a telephoto lens (70-200mm) is perfect for detailed close-ups. A prime lens (50mm) offers versatility and excellent image quality.
Tripods and Filters
A sturdy tripod is essential for sharp images, especially in low light. Polarizing filters reduce glare and reflections, enhancing color saturation. Neutral density (ND) filters allow for longer exposures in bright conditions.
- A **sturdy tripod** ensures sharp images and stability.
- **Polarizing filters** reduce glare and enhance colors.
- **ND filters** enable long exposures in bright conditions.
- **Remote shutter releases** minimize camera shake.
With the right equipment, you can tackle any scenario and capture professional-quality automotive photos.
Mastering Lighting Techniques
Lighting is crucial in automotive photography. Understanding how to manipulate and utilize light will dramatically improve your images. Explore various lighting techniques to achieve stunning results.
Effective lighting can make or break an automotive photograph; mastering artificial and natural light is essential for showcasing a car’s beauty, enhancing details, and creating the desired mood.
Natural Light Photography
Shooting during the golden hours provides soft, warm light that enhances car details. Overcast days offer diffused light, ideal for even exposures. Avoid direct sunlight, which can create harsh shadows and reflections.
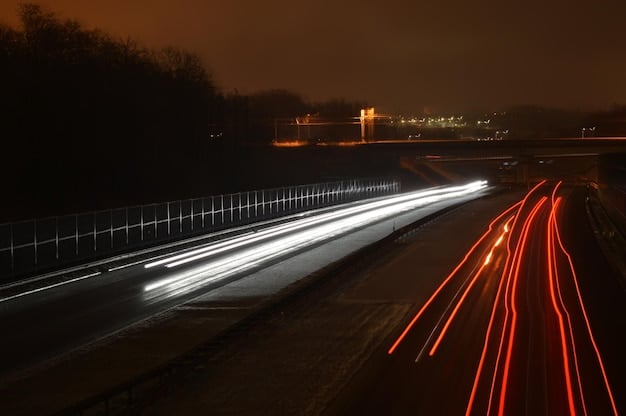
Artificial Lighting Techniques
Using strobes, speedlights, or LED panels can add dramatic effects. Light painting involves using a handheld light source to illuminate specific areas of the car during a long exposure. Experiment with different modifiers like softboxes and umbrellas to control light spread.
Location Scouting and Preparation
The location plays a key role in automotive photography. Choosing the right environment can complement the car’s design and enhance the overall image. Careful preparation is also essential to ensure a smooth shoot.
Choosing the right backdrop and meticulous planning can significantly enhance automotive photography, harmonizing the car with its environment and ensuring every detail is perfect for a standout image.
Finding the Perfect Spot
Look for locations that complement the car’s style. Urban environments, scenic landscapes, or industrial settings can provide striking backdrops. Consider the background clutter and ensure it doesn’t distract from the car. Scout locations in advance to assess lighting conditions and potential challenges.
Preparing the Car
A clean, well-maintained car is essential. Wash and wax the car to remove dirt and imperfections. Check tire pressure and ensure all lights are functional. Pay attention to small details like removing stickers and cleaning windows.
- Choose locations that **complement the car’s style**.
- Ensure the background **doesn’t distract** from the car.
- **Wash and wax** the car to remove imperfections.
- Pay attention to **small details** like tire pressure and lights.
By finding the perfect location and preparing the car meticulously, you’ll set the stage for amazing photos.
Post-Processing Techniques
Post-processing is a vital step in automotive photography. Editing software like Adobe Lightroom and Photoshop allows you to refine your images, correct imperfections, and enhance details. Here’s how to approach post-processing to achieve professional results.
Post-processing transforms great automotive photos into stunning masterpieces. Mastering editing techniques like color correction, detail enhancement, and blemish removal refines images to perfection.
Basic Adjustments
Start with basic adjustments like exposure, contrast, and white balance. Adjust highlights and shadows to balance the image. Correct lens distortions and remove chromatic aberration.
Advanced Editing Techniques
Use local adjustments to enhance specific areas of the car. Sharpen details and reduce noise. Adjust colors to create the desired mood. Consider using filters and presets for consistent results.
Creative Angles and Perspectives
Experimenting with different angles and perspectives can add creativity and uniqueness to your automotive photography. Instead of always shooting from eye level, try these creative perspectives to capture more dynamic and interesting shots.
Unique angles and perspectives can elevate automotive imagery. Experimenting with low angles, drone shots, and creative compositions captures a car’s essence in ways that traditional photography can’t.
Low Angle Shots
Shooting from a low angle can emphasize the car’s size and power. Place the camera close to the ground and angle it upwards to create a dramatic effect. This is particularly effective for showcasing aggressive designs and large wheels.
Drone Photography
Drones offer unique aerial perspectives that can highlight the car’s surroundings. Use drone shots to capture the car in scenic landscapes or urban environments. Be sure to follow local regulations and respect privacy.
| Key Point | Brief Description |
|---|---|
| 📸 Basics of Photography | Grasp lighting, composition, and angles to enhance your car photos. |
| 💡 Essential Equipment | Use suitable cameras, lenses, and filters for professional-quality shots. |
| ☀️ Lighting Techniques | Master natural and artificial light to accentuate car features. |
| 🏞️ Location Scouting | Find locations that match the car’s style and ensure it is pristine. |
Frequently Asked Questions
▼
The best times are during the golden hours—sunrise and sunset—when the light is soft, warm, and flattering. These conditions minimize harsh shadows and bring out the car’s details.
▼
A DSLR or mirrorless camera with manual controls, a variety of lenses (wide-angle, telephoto, prime), a sturdy tripod, polarizing filters, and potentially neutral density filters are essential.
▼
Post-processing is crucial for refining images, correcting imperfections, enhancing details, and adjusting colors to achieve a professional-quality final product. It can significantly elevate your photos.
▼
Common mistakes include shooting in direct sunlight, not cleaning the car, neglecting the background, using poor composition, and underutilizing post-processing techniques.
▼
Choose a location that complements the car’s style and doesn’t distract from it. Urban, scenic, or industrial settings can work well. Scout in advance to assess lighting and potential challenges.
Conclusion
Mastering the art of automotive photography requires a blend of technical skill, creative vision, and attention to detail. By understanding the fundamentals, investing in the right equipment, and continuously practicing, you can capture the beauty and essence of cars in stunning visual stories.


